
A small MPLS test network built with OpenBSD
A few months ago, I wrote a diff to simplify the calculation of ICMP extension header checksums in the OpenBSD kernel. It so happened that the code is only used by the OpenBSD MPLS subsystem. I didn’t have access to an OpenBSD-based MPLS network at the time, nor was I familiar with MPLS in general; so in the spirit of the OpenBSD hacker mantra “shut up and hack,” I set out to build a small MPLS test network to test my diff. :)
This blog post documents my experience setting up the MPLS network; hopefully someone out there will find it useful.
WARNING: I set up this network a few months ago and it’s very likely that I have forgotten a bunch of details. Also shortly after I committed my diff, one of the nodes in the network died from a power brownout/surge during a crazy thunderstorm and I haven’t had a chance to rebuild the network. So most of this blog post is based on my notes and fuzzy memory. You’ve been warned!
If you’re not familiar with OpenBSD’s implementation of MPLS, you’ll first need to read Claudio Jeker’s (claudio@) EuroBSDCon 2011 paper: Demystifying MPLS: The MPLS Framework in OpenBSD (PDF). I designed my small (tiny?) test network as a subset of Claudio’s example network (see page 6 of the PDF for a diagram of his network). To minimize variables, I used the exact same IP addresses and MPLS labels where possible. If you’re just getting your feet wet with MPLS on OpenBSD like I was, I suggest doing the same.
Here’s how my simple four-node test network looked like:
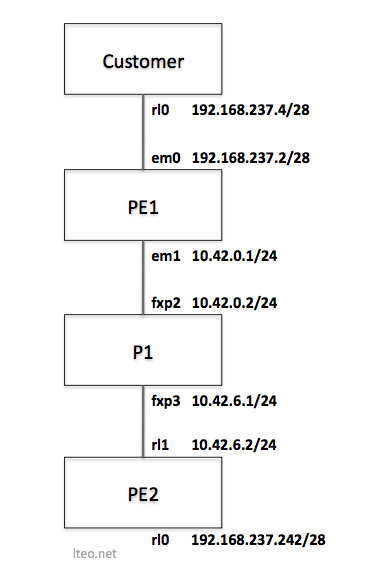
If you’re not familiar with MPLS terminology, P is Provider, and PE is Provider Edge. What they are is explained in the paper. :)
The goal is to get the Customer at 192.168.237.4 talking to the IP address behind PE2 (192.168.237.242).
By the way, if you feel like trying this out, I highly recommend using OpenBSD -current (or OpenBSD 5.4 when it is released in November 1, 2013); there were a bunch of ldpd(8) commits made at the t2k13 hackathon in June 2013 so it helps to be as up-to-date as possible.
Here’s how I set up each system. PE1, P1, and PE2 will all run ospfd(8) and ldpd(8). PE1 and PE2 will run bgpd(8).
Customer Setup
ifconfig rl0 192.168.237.4/28
route add default 192.168.237.2
PE1 Setup
PE1 interface config:
ifconfig em0 rdomain 1
ifconfig em0 192.168.237.2/28
route -T1 add default 192.168.237.1
ifconfig lo1 10.42.42.1/32
ifconfig em1 10.42.0.1/24 mpls
ifconfig mpe0 rdomain 1
ifconfig mpe0 mplslabel 666
ifconfig mpe0 192.168.237.2/32
PE1 /etc/ospfd.conf:
router-id 10.42.42.1
area 0.0.0.0 {
    interface em1
    interface lo1
}
PE1 /etc/ldpd.conf:
router-id 10.42.42.1
interface em1
PE1 /etc/bgpd.conf:
router-id 10.42.42.1
AS 3.10
rdomain 1 {
    descr "CUSTOMER1"
    rd 3.10:1
    import-target rt 3.10:1
    export-target rt 3.10:1
    depend on mpe0
    network inet connected
    network 0.0.0.0/0
}
group ibgp {
    announce IPv4 unicast
    announce IPv4 vpn
    remote-as 3.10
    local-address 10.42.42.1
    neighbor 10.42.42.2 {
        descr PE2
    }
}
PE2 Setup
PE2 interface config:
ifconfig rl0 rdomain 1
ifconfig rl0 192.168.237.242/28
ifconfig lo1 10.42.42.2/32
ifconfig rl1 10.42.6.2/24 mpls
ifconfig mpe0 rdomain 1
ifconfig mpe0 mplslabel 666
ifconfig mpe0 192.168.237.242/32
PE2 /etc/ospfd.conf:
router-id 10.42.42.2
area 0.0.0.0 {
    interface rl1
    interface lo1
}
PE2 /etc/ldpd.conf:
router-id 10.42.42.2
interface rl1
PE2 /etc/bgpd.conf:
router-id 10.42.42.2
AS 3.10
rdomain 1 {
    descr "CUSTOMER1"
    rd 3.10:1
    import-target rt 3.10:1
    export-target rt 3.10:1
    depend on mpe0
    network inet connected
}
group ibgp {
    announce IPv4 unicast
    announce IPv4 vpn
    remote-as 3.10
    route-reflector
    local-address 10.42.42.2
    neighbor 10.42.42.1 {
        descr PE1
    }
}
P1 Setup
P1 interface config:
ifconfig lo1 10.42.21.1/32
ifconfig fxp2 10.42.0.2/24 mpls
ifconfig fxp3 10.42.6.1/24 mpls
sysctl net.inet.ip.forwarding=1
P1 /etc/ospfd.conf:
router-id 10.42.21.1
area 0.0.0.0 {
    interface fxp2
    interface fxp3
    interface lo1
}
P1 /etc/ldpd.conf:
router-id 10.42.21.1
interface fxp2
interface fxp3
Putting it all together
Now that all the config files are in place, it’s time to start up the daemons and give the network a whirl. At this point, I really wish I still have the test network so that I can provide specific instructions on starting the daemons and confirming that they work as expected.
But I do recall an important bit of information. The daemons need to be started in this order: (1) ospfd, (2) ldpd, and (3) bgpd. (see the end of Claudio’s misc@ post).
So if I recall correctly, this is what I did:
- Set up the network as above.
- Start ospfd on PE1, P1, and PE2.
- Test that PE1 and ping P1 and P1 can ping PE2.
- Start ldpd on PE1, P1, and PE2.
- Start bgpd on PE1 and PE2.
If all goes well, the Customer system should now be able to access the IP address behind PE2 (192.168.237.242) over the MPLS network.
If I ever set up the test network again, I’ll update this blog post with more specific details.